Hello hello! We meet again in another new article! In this occasion, I’ll share you everything I know about animation in Zep.us virtual space. As we know, Zep.us provide a cool feature which you can insert animation on your virtual space. It makes the virtual space experience more engaging and more fun! We can’t get that back then on Gather. Imagine you can have a flowing fountain, flying butterfly above you, and many more. The limit is your creativity! But all the information about how to set it up is quite limited. I need to did many trial and error before I could understand how it works. But worry not, I’ll share everything I know about it in this article! So let’s go!
Where Animation Are Placed on the Map Hierarchy
Map hierarchy is actually a structure of layer order that works on a the virtual space map. Basically, the map hierarchy in Zep is (from the most bottom one) Floor (Map Background) > Wall > Object (I call it Bottom Object) > Avatar > Map Foreground > Top Object. Wall is actually optional if you already have the background, you don’t actually need it. Visually speaking, you can see the hierarchy on the image below :
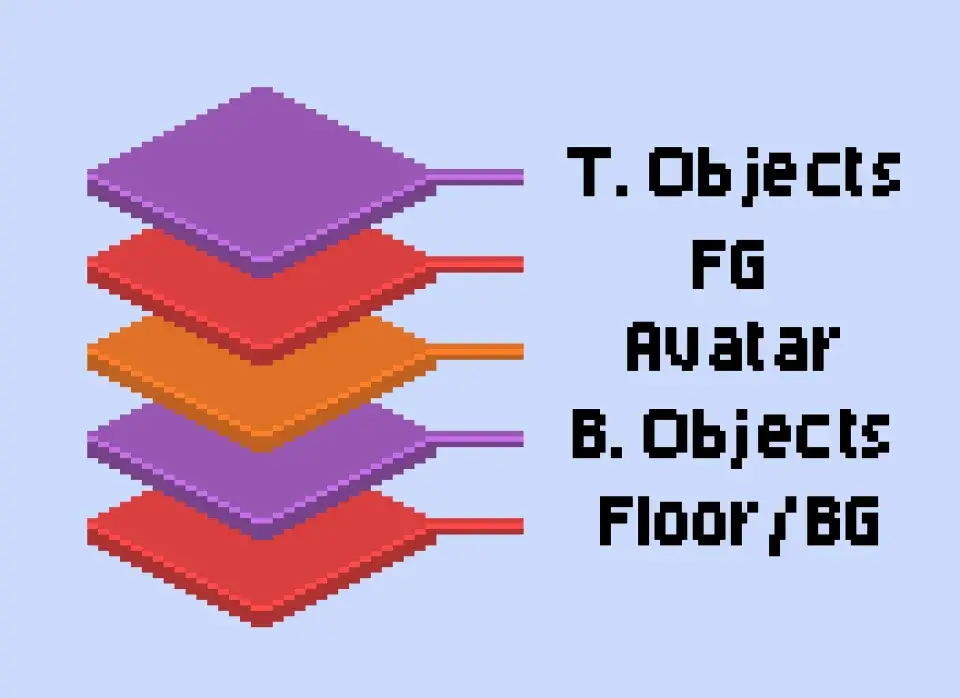
But for animation, it’s quite tricky. Somehow, animation object always be placed on the Top Object if we add the animation object in .GIF format. Even if we place it on Bottom Object, it will appear on top of the avatar and map foreground. But if we add the animation object as a regular object on Bottom Object later, then add an animation interaction to it, the hierarchy will works well as it should be. I’ll explain about the format in detail later, so don’t worry. At least we can be on the same page first about the hierarchy. Understanding this system is crucial for building the best map experience for your virtual space.
What Is the File Format for the Animation
As I mention before, there are 2 ways to add the animation to the space. So we can have 2 file format that can be used as animation in Zep.us. Which is in .GIF as a single animation object and in .PNG as sprite sheet. Those 2 file format works pretty well in Zep.us, since they accept both file formats, but it just works differently. What’s the different between .GIF and .PNG file? So basically .GIF stands for Graphic Interchange Format. We use it to play a short looping animation that play automatically. So if you see a file as .GIF file, it will play the animation in looping automatically when you open it. On the other side, .PNG stands for Portable Network Graphic. It’s basically a popular format for a static image that support transparent background.
To make it easy, .GIF is for looping animation image, and .PNG is for a static image with transparent background (sometimes). Both files are generated differently. I won’t explain how to make the .GIF or .PNG file here, I’ll assume that you already have the file. But if you need it as a dedicated article, just make a comment and I’ll try to make it. Don’t worry, at the end of this article, I’ll provide some samples for you so you can try it yourselves or maybe use it on your own space. Let’s move to how to add the animation on each file format in the next section.
How to Add Animation in .GIF Format
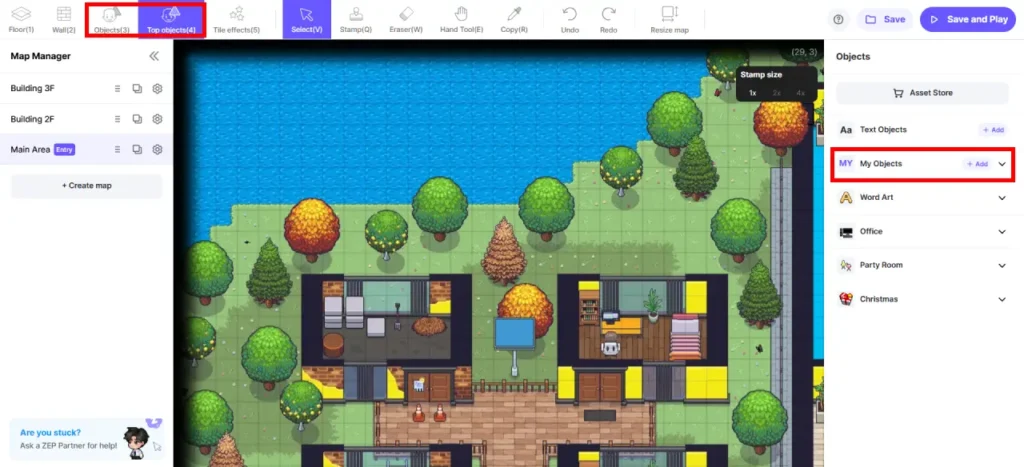
To add animation in .GIF format, it’s actually pretty straight-forward. All you need to do is just go to the Map Editor. Then on the top left bar, you will see ‘Objects (3)’ and ‘Top objects (4)’, you can choose either of it based on where you want the object to be placed. Remember the map hierarchy we discuss about before. Click it. Then on the right bar, you can see ‘My objects’ and a ‘+Add’ button beside it. Click the ‘+Add’ button. Then you can upload your .GIF file there one by one. Just keep in mind that the file size should be under 1024×1024 pixels and the volume should be under 3MB.
After you add your .GIF file, the object will appear under ‘My Object’. Click the ‘Stamp (Q)’ on the top bar, then place the object anywhere you want. The object will be automatically become an animation. You can save and play to check it. As I mention before, if you upload your animation using this method, please expect the object to be above your avatar. Because somehow it always being placed on the Top Object even if we place it on Bottom Object. I don’t really know why. But if you want to place the animation object below your avatar, you might need to upload it using the second method on the next section.
How to Add Animation in .PNG Format
The second method is actually the old method if I’m not mistaken. I remember that Zep.us didn’t support a direct .GIF before. So to add animation, we only have this method back then. It’s more complex since there are some steps that we need to do to set it up. But worry not, I’ll explain it one by one.
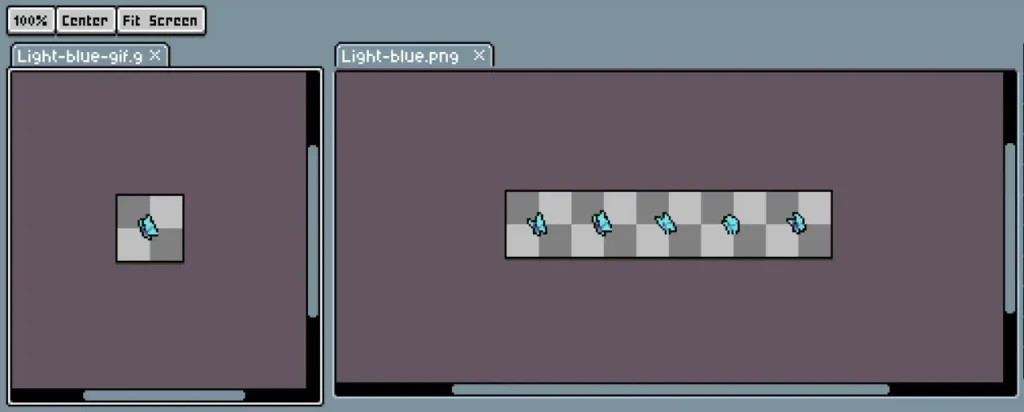
First thing first, you need to prepare the sprite sheet file and the preview file. The sprite sheet file is the file which contains the animation but in frame-by-frame image. The preview file is just as simple as the first frame of the animation, or any other single frame you want (doesn’t matter), just for the object preview. You can see the difference on the image below :
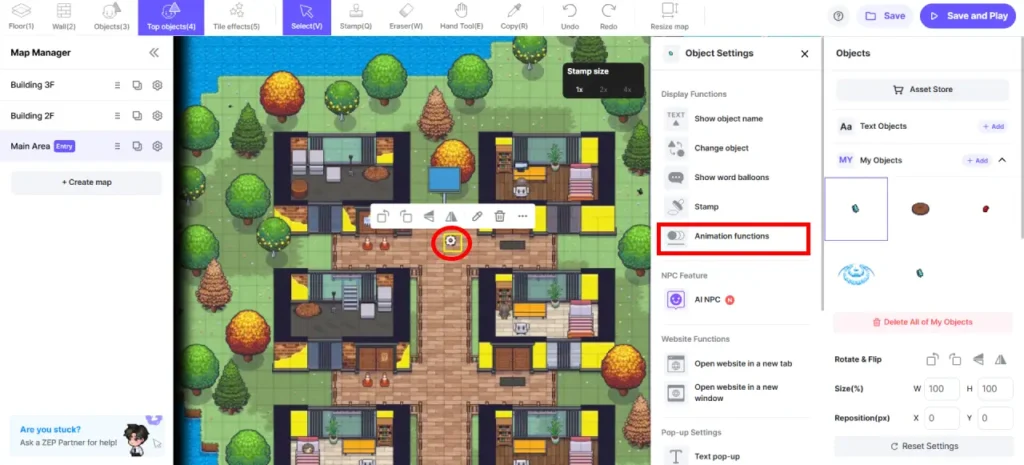
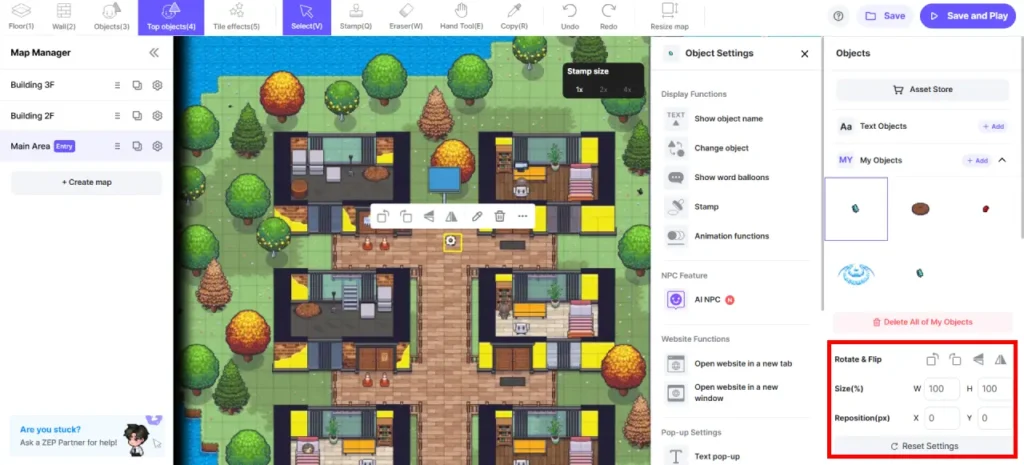
After all those 2 files ready, you can open the Map Editor, go to the object’s layer you prefer, and upload the preview file on the ‘My Object’, similar with what we do on the first method. Then place the preview file object anywhere you want to. After placing the object, you will see a gear icon just beside the placed object, click it. If you can’t click it, you can click the ‘Select (V)’ first on the top bar, then click the gear icon. You will see a new panel called Object Setting popping up, choose ‘Animation functions’.
You can skip the object name, it’s optional. Then upload the sprite sheet file on the ‘Image Sprite File’. Here’s the tricky part, you need to know the exact width and height of your sprite sheet image. You can check it on the image properties, it usually there. And then for the frame number, it’s actually the number of frame you have on your animation sprite sheet. If you see the butterfly sprite sheet image above, there are 5 frames in it. You need to type the exact number on width, height, and frame number, otherwise your animation will look weird or unfit.
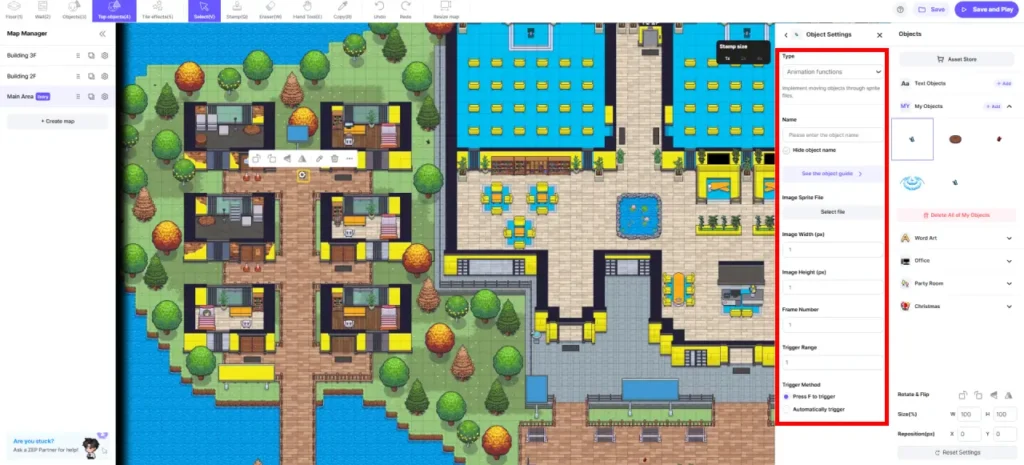
Then for the ‘Trigger Range’, you can set it as how far the distance you want the animation to start playing. Let say you want the animation plays when the avatar is 10 tiles apart to the object, then make it 10. It counts horizontally and vertically, so if you type 10 on it, the distance will be 10 to north, 10 to south, 10 to west, and 10 to east. The last one are ‘Trigger Method’, you can choose between make it plays after people press F, or just play automatically. It’s pretty tricky, and need some time to familiarize, but I believe you will be easy to get used to it.
Some Additional Tips for Better Workflow
Sometimes, you might need to add the animation facing both way, like facing left and right for the butterfly to make it more natural and nice visually. Making 2 different files for facing left and right will be to much work! Zep.us has a pretty cool feature to flip the object directly without uploading a new file. While clicking the gear icon on the object like before, you will see a panel on the bottom right. You can see a triangle icon to flip it vertically or horizontally. Even though you can’t flip any object directly, I believe that you will save a lot of time rather than making a new animation object.
Second tips, adding too many animation object could make the memory of the map bigger, which affect the loading time to access the map. So better to keep it in a small number. I know that you might want to make an animated water around the map, but that’s not a wise move I believe.
Third tips, be discipline with the layer system. The .GIF method is easier to setup, but make sure to always place it on the Top Objects layer instead of Bottom Objects layer. While the .PNG method could work well as both Top and Bottom Objects, for me I prefer to just place it on the Bottom Objects. The .PNG methods actually taking a smaller memory than the .GIF method because not all the animation are playing at the same time, but only when the avatar is on the trigger range.
Last tips, animation could be a great way for branding. So if you have an animated billboard, running text, animated logo, I’ll recommend to use it on the space. You could elevate the user experience by just adding those small details. Animating water terrain except waterfall is not worth it some times, it just take a lot of memory for a small impact. You can also add animated rain or snow with a combination of static foreground and Top Object animation, maybe 70% static foreground and 30% animated will work well and nice without taking too much memory.
So that’s all you need to know about animation in Zep.us virtual space from me. Hope you can learn something new today! I’ll leave the sample files on the button below, and also the demo space that you might want to check where I placed animated butterfly and fountain. If you are interested on making a custom Zep.us for your virtual space maybe for office or even for school, and you need an expert to do this, you can contact me here and we can always discuss about it! So see you next time in the next article! Sampai jumpa lagi!