
Hai hai! How’s life? I’m grateful because everything going better and better everyday. I hope a good good luck for you so! And a great news comes from Gather Town official. At 12th April they launch a new feature for the event type space on Gather Town. Its a big update thats makes event type space changing for 180 degrees. I also found many big features that you can see on my previous article here. When you see that article, I show 7 features that will make you interested to held some event on Gather Town. But I found out that configuring the Scheduled Session for the event type is little bit tricky.
I got confused for 2 days just to figure out where to found the Setup things. Gather give the changelog, but its not clear enough I think. Also some Gather Enthusiast from the community approve it, he said that its like “How to Draw an Owl Meme” LOL (google it) I laugh when I see this. You dont need to run into it! I will try to make more comprehensive tutorial on how to configure scheduled session for your Gather Town event. So check it out!
Configuring from Scratch
Basically configure your scheduled session for your Gather Town event isn’t that hard, its just tricky. To activate the scheduled session, you need to make an event-type space. Not others! It need to be exactly event-type space. How to figure it? When you click Create Space on the upper right panel, an option will popped-up. It consist 3 types of space you can choose. Choose the middle one. When you want to make a remote-office one, you choose the left one.

After you click the middle one, click the Select Space button. For me, I usually choose Advance setup for expert, because I always make a map using another software, and upload it to Gather. But in this case to activate Scheduled Session feature, I think we need to choose Select Space button instead of the Advanced setup one. Eventhough we want to make the space from blank. In this section I will explain on how to make the templated map first, in the second section I will explain about how to make it from blank map.

After you click Select Space button, you will directed into 5 questions page. Its a basic questions, this question will help you to make a quick space one for your event, based on the recommedation from Gather, I will explain it later. Stop on the 5th question. There will be 2 option, “Would you like to create a new Gather Space?” If you want to make a new templated map, choose the left one, which is “Yes, create a new space”. You will directed into a ‘new-model-of-templated-map, not like the old one. You will have 1 main area as lobby, you can add up to 5 rooms there.

Your previous 4 answer of the questions will affect the model of this templated map. For example if you choose 0-25 participants, then the lobby will be the small one, far less bigger than if you choose 100 participants. You can explore it by yourself. It will only affect you if you are the kind of person that want a quick space one for your event. If you care about aesthetic of your map, and love to make something from scratch customize, that question is not that important.
After you answer the 5th questions, you will be directed into Setup Checklist page. If you want to know about configuring for the previous space, go to the second section. But if you dont want to, you can jump to the third section here.
Configuring for Previous Space
If you choose to configuring for previous space, you need to make an event-type space first, then do back this tutorial from the first step. You can choose the Advanced setup for experts, then make a event-type space like you usually do for making Gather Town Space. Choosing the event-type space (the one that you choose after you give a name to your space) is super important things to do. Because this feature only applied to event-type space, so if you choose remote-office, you cant use this features.
In the first section, I mention that to activate this feature, you can’t choose Advanced setup one. Because if you choose the advanced setup, you will not directed into the Setup Checklist page, and Setup Checklist pop-up panel will not shown up on your space interface. I think Gather only directing Setup Checklist from the Select Space button one on Create Space, and the one when you choose Create Event. Its more likely like Event feature is not a space, its like a feature that overwrited into your space.
So if you want to make a custom space one for your event, you need to make the space first, then link the event to your previous space. Also you still can choose the “Yes, create a new space” one on the 5th question, after you configure your session, you can edit your map on mapmaker like usual. think its wasting time because you need to delete the template room first, and add your new customized room. But yeah its possible!
After you make your space, and go back to the first step of this tutorial, then choose “No, link to an existing space” as your 5th answer. Choose the space you already made before, and you will be directed to Setup Checklist page. From now on, the step is totally similar between the customized-map space and the templated-map space.
Setup Checklist

Before going to Setup Checklist, you will be asked if you want to add collaborator to manage your event. There will be 2 new taxonomies here, Event Owner and Event Editor. Owner can manage all things about the event, but Editor can only edit the things in this setup checklist. If you were not inviting anyone in this time, you can always invite someone later on Invite collaborator button on the Setup Checklist.

On Setup Checklist, you will have 4 to-do-list you need to complete to publish your event. The first one always already checked. Unfortunately you can’t change your choosen space here. If you are misclick the space, you need to start from the beginning. On the 2nd checklist, you can manage your session. On the 3rd checklist, you can make a landing page for your event. The 4th one is for publishing your space. I will explain about Event Landing Page first.
Event Landing Page
Event Landing Page basically like a landing page — of course — as an onboarding page for your participant. So when you share your event, all participant will be landed in this page first before going to the space. On the landing page you can add a cover image. It can be your event banner where there are the photo of all speaker. You can write the host and the description of the event. I think this landing page feature is super-cool as onboarding page before participant come to the event space. Look at this landing page preview below.
On the upper section, you can see the event title and cover image. Also time and the host. Participant can add to Calendar, Share, and also Save to save the event to their Gather event dashboard. On the second section you can see the event description and also, the Schedule! This is the best part. You can make your event more professional using this landing page. People can see all the event schedule from the landing page, the upcoming schedule and also the session that already end. Here I show you how an Live session wil be shown on Landing Page.

Make sure before sharing the landing page, you add the session first. When participant click on Join of the Ongoing Session, they will directly goes to the room where the event happen. So they dont need to walk and get confuse on where the event happen.
I will explain on how to add session after this. On the third section, you can see basic tutorial that already provided by Gather. So all new-comer can learn about the platform first before going to the space. Its cool! Like we held a profesional event one. Well managed!
Add New Session

After you learn about Landing Page, you need to add new session to add schedule to the landing page. This session will activate the Session panel on your space. When you make a session on Room X at 1PM, so when you access Room X at 1PM as moderator, you can see the session panel icon on the bottom panel.
To add new session, simply click Manage Session on the Setup Checklist. There you can see two option, Schedule and Room. Its a list of each of that. Room will be use to see the room you already make before. In case you make the room name randomly, you can see the preview of each room first before choosing to make a session on that room. To minimize misschoose of the session room placement.
On Schedule, you can add schedule by clicking Add Session button. You can add as many sessions as you want. I still dont know yet about if there are limitation of how many session we can have. When you click Add Session, there will be some form you need to fill.
First one is the session name, session description, starting and ending time, the session room, and also speaker. I think all things was clear, except the Speaker one. I will explain about it in the next section.
Add Speaker

We can add speaker on each session, and the speaker bio will be shown on the landing page schedule. We can add multiple speaker into each session. When we fill the speaker email, the speaker will get notification on their email simultaneously. Gather said that speaker will have a special presentation feature on their assigned room, but I can’t find it yet. Speaker will get their self spotlight feature when their presentation time ongoing. After it, they just a basic participant that can only raise hand except you give them Moderator role.
After you finish about adding session and speaker, you can choose Back to checklist to come back to the Setup Checklist.
Share Event
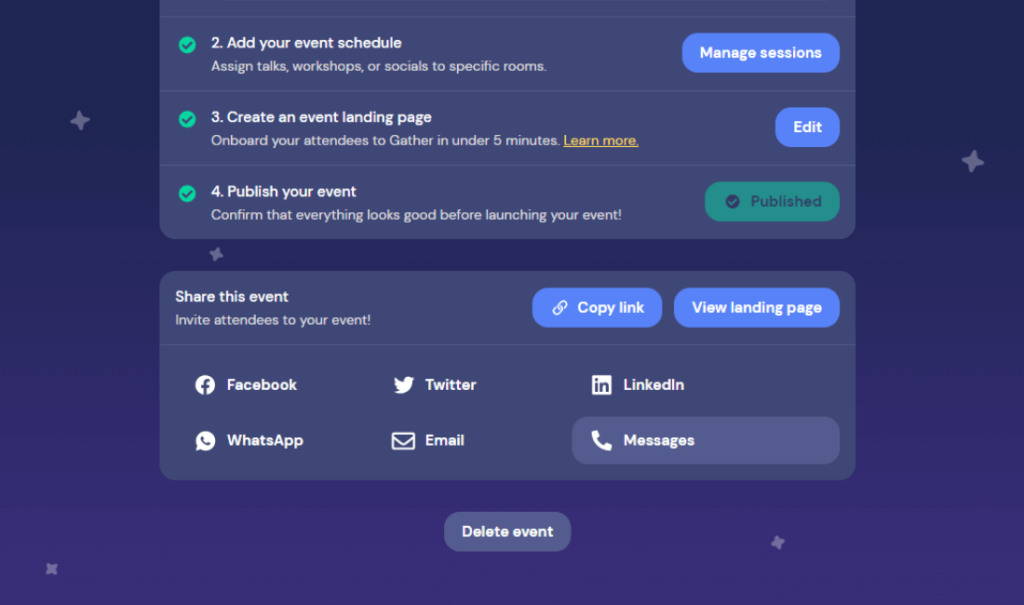
After you finish editing the first 3-checklist, you can Publish your event. Then click on Publish, there will be a pop-up message of confirmation of the event. After it, a Share Event Section will appear in the bottom of your Setup Checklist. You can share your event through many kind of medium, Facebook, Twitter, LinkedIn, WhatsApp, e-Mail, and Message (SMS).
Gather will automatically generate custom link on the new tab for you to share your event, easy enough for anyone I think. No need to generate custom link anymore. When people click on your invitation, they will directly goes to your Event Landing Page. I think for the next development, Gather will launch about on-platform Analytic so you can see analytic about how your event run. But I still dont know yet when it will be launched. Just know that its already be on development timeline of Gather official.
After all this setup things, you can go to the 1st checklist and you will see a button that say “Enter Space” to go to your space. You can customize your space here. And your step of configure scheduled session for your Gather Town event is done! Enjoy the moment of exploring the new feature!
Something to take a Note

First time you try to configure scheduled session on your Gather Town event, in your space interface you will see the Setup Checklist pop-up to direct you to the Setup Checklist Page. But after you close the space, and enter it again from the space dashboard, you will not see this pop-up anymore. First time, people will be confuse on how I can do editing to the Setup Checklist if the pop-up dissapear?
To access the Setup Checklist, you can go back to your Gather Dashboard, and choose Event on the upper left panel. Click to your event, and it will directed into Setup Checklist Page. Quite tricky, but yeah thats all we can do for right now. Maybe later Gather will give some access on the space interface like on Setting or somewhere else. So we can access the Setup Checklist directly when we are on the space rather than go back to Gather Dashboard.
Second one, the Session panel icon will only appear when your avatar is on the event room, and the event ongoing. If you dont find the icon, dont panic! Maybe you are not on the right room. Or maybe the Event Owner didn’t give you a Moderator Role yet. Ask to the Event Owner. Event Owner must be the Admin of the space. You can’t make an event yourself and link it to other people space. So if you are an agency that manage the event, make sure you have the admin role of that space before making the event.
To edit, add, or delete Speaker list, you can only do that on the Manage Session on the Setup Checklist, nowhere else. So make sure you already have a fix speaker before the event going on. Sometimes editing this takes time, and it can ruin the flow of your event.
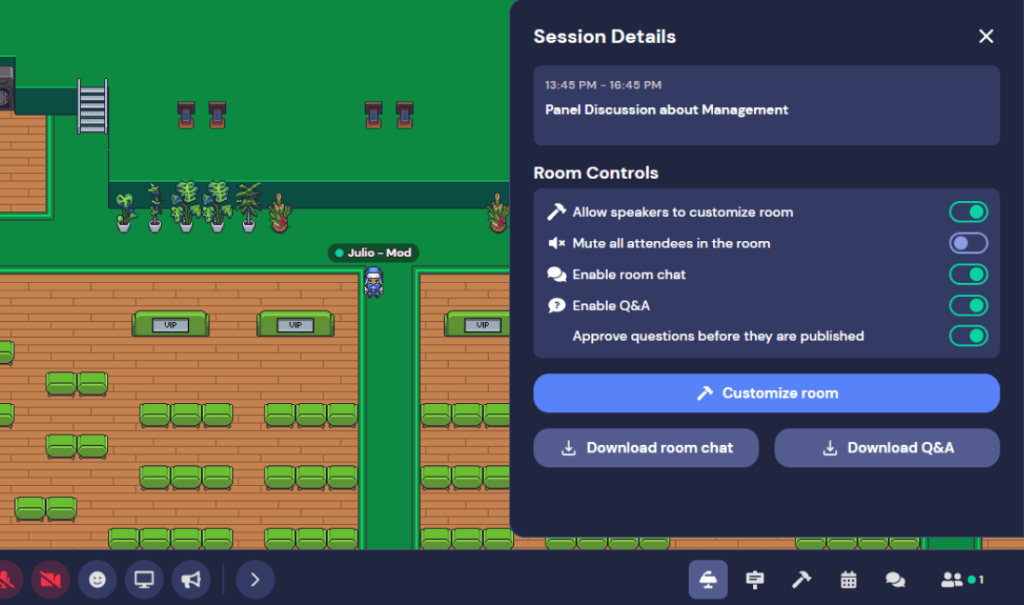
On the Session Panel, you will see “Allow speaker to customize room”. I think it should be use if the speaker need to add object on the mapmaker live when they are doing their session. But I think its not necessary if you have a dedicated builder that standby for it. Maybe the speaker need to make an interactive session with many interactive object that only appear at a moment, the builder can do it for the speaker. Or you can just make a time limited object for it and prepare it before the event so it will be shown and gone at the exact time you setup before.
This Scheduled Session was giving many posibillity to do more profesional event on Gather. Good job for Gather team! Big event will be easier to do and manage using this features. No need to make a website to just show the schedule of the event that going on Gather, now we can show the entire schedule to the participant through Landing Page that Gather already provide. It cut cost and time actually for us as a event manager using Gather as platform.
I’m excited to see what kind of improvement that Gather team will do in the future. Its super cool and lovely to become a witneess of the new platform developing in a improving slope. So thats close my tutorial about configure the scheduled session to your Gather Town event. If you still have any question related to this tutorial, just left a comment and I will be happy to answer if I can. Also if you want to give appreciation, you can go to my Ko-fi site to give me some coffee, it will be appreciate so much for this site development. See you next time in the next article! Sampai jumpa lagi!
1 thought on “How to Configure Scheduled Session for Your Gather Town Event”
Pingback: Gather Town Extension Explained! - With Julio