Hi there! We meet again after a long break! My last Gather Town Tutorial was on the middle of April about Configuring Scheduled Session, and here we meet again on August! How about you? Any exciting things happen on your Gather Town space? Since the last update on April, so far I know Gather team still didn’t launch any big update to the platform if we see from the changelog. The last biggest update was the Scheduled Session on event-type space and Adding Pets on April.
But after years been exploring Gather, I still found that not many people know about Gather Town Extensions. Many people know about Mapmaking, but not about Extension. I think it’s because the Extension menu was literally hidden somewhere so it can’t be found without deeper exploration. So today I will explain to you about what is Gather Town Extensions and when is the best time to use it. Check it out!

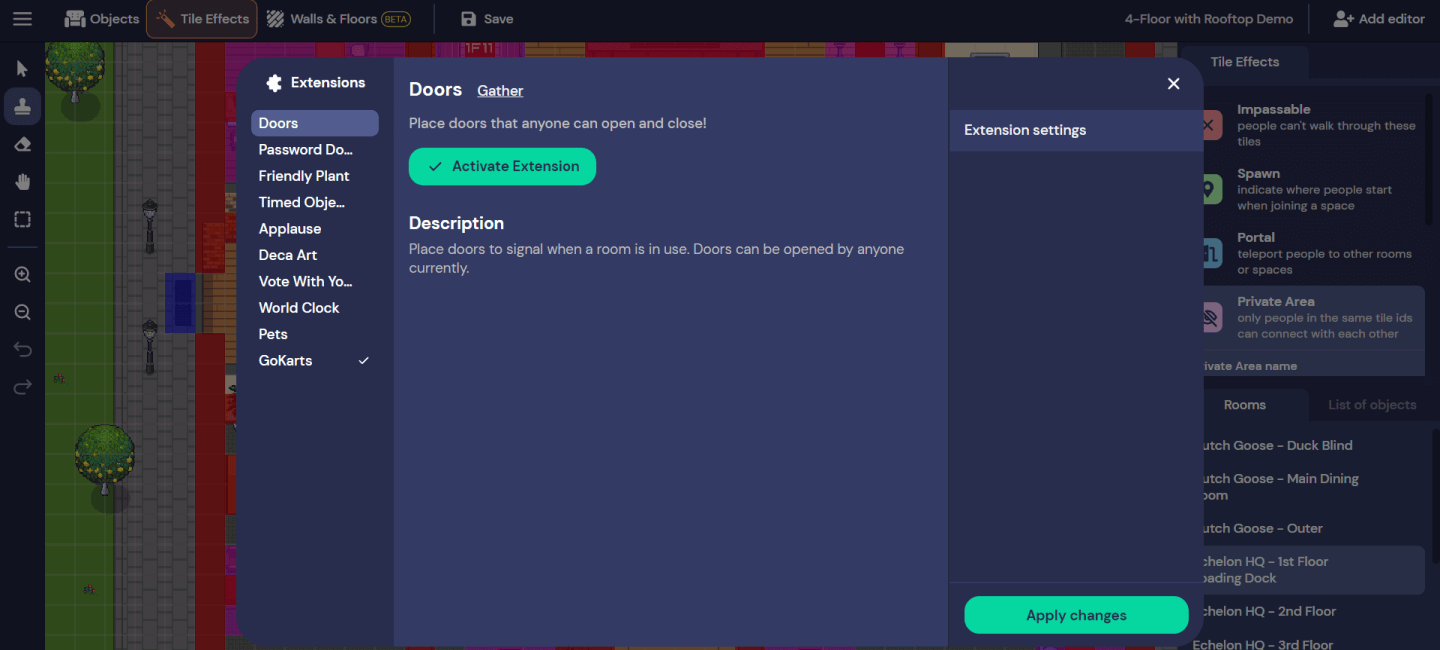
Where is the Extensions located?
Basically, extensions are used for some feature that can’t be easily placed like what we do on Mapmaker. It need some sort of code to launch the object/activities, so the developer made this feature easier for us to use by making this extensions. We can easily activate/deactivate the extensions from the Extensions Panel. While its deactivate, it simply can’t be used, common sense hehe. The most famous extensions for mapmaker is Password Door, Pets, and GoKarts (GoKarts wasn’t an extension on the old version, but it become extensions later, I already explain it on the previous article).
The question is, where is this Extensions located? Its located when you access Mapmaker. You can click on the hammer icon on the bottom side of your user interface, then click Edit in Mapmaker. It will open a new tab called Mapmaker. I already explain about the basic of Mapmaker on my previous article. On the Mapmaker dashboard, you will see a hamburger icon on the top left side, click it and it will open a dropdown menu. On the last menu, there are Extension Setting. There is the Extensions located. As far as I know, the Extension Setting interface never been updated from the last year, but the number of Extensions was regularly updated by the developer.
To use the Gather Town extensions, you can simply click the green “Activate Extensions” button until it shown a checklist beside the extension name. Then you can click Apply Change on the bottom side to Apply the extensions activation/deactivation. There are plenty of extension you can use. I will explain about all the extensions shortly, if some extension get some traction than the others, I will make it into a separate article.
Doors
There are 2 kind of Doors extension, the first one is Doors, the second one is Password Doors. Its easier to call the first one with Locked Doors — since we can make an automatic open/closed door using Active Image without using any Extensions, you can see the example of automatic open/closed door in my demo space here.
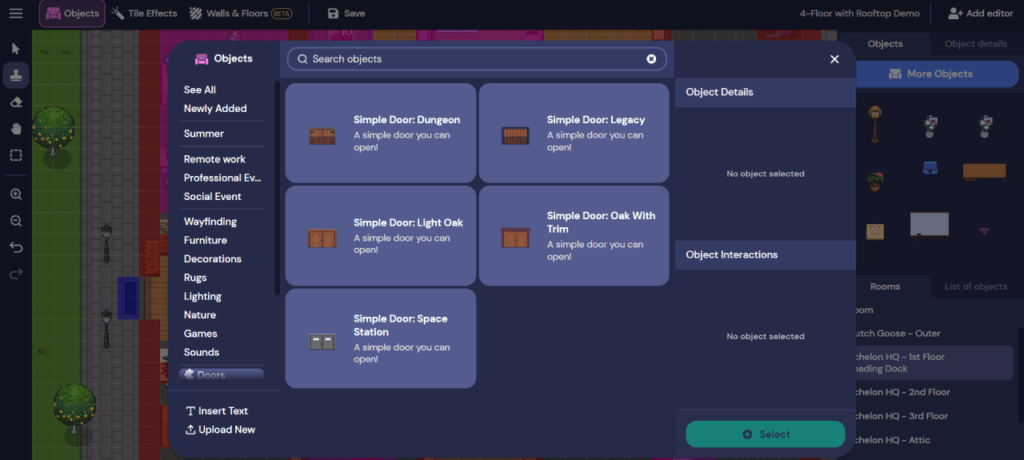
If we used Locked Door, people need to press X to open the door, and press X again to close the door. Its basically as simple as the code making/remove an impassable tiles on the door while we press X. While the Password Doors is a Locked Door with a password mechanism. After you activate the Doors and Password Doors, it will be appeared on the More Objects dashboard. After you click on “More Objects” button, just scroll it and you will see your extensions on the left side with a puzzle icon.

You can change how the doors looks like by uploading your own door’s picture on the Open door and Closed door. There are a field for Un-highlighted and Highlighted. If you only have the highlighted design version, just upload the same design for the un-highlighted and highlighted.
Basically, the highlighted one is for when someone being around the activation distance, which is defaulted into 1 tiles for this extension, and vice versa for the un-highlighted one.
So 2 designs for the open and closed one is enough to customized the door, but if you want it to be more detailed, you can make 4 different designs. Make sure you make the design to be 4×2 tiles, and the door in the bottom middle of the design, because the code will automatically make a 2×1 impassable tiles on that tile. If you make it to be 5×2 tiles, it will become a weird-looking door, since we can’t adjust the automatically made impassable tiles more than 2×1 without editing it on the back-end.
Password Doors
For the Password Doors, you can customize the visual the same as Locked Door. To activate the password, you need to save the Mapmaker first, and then edit it by pressing X to the door using your avatar on the main dashboard. After you press X on the door, a pop-up will appear.
You can edit the password if you are an admin/moderator. Press edit and there will be 3 field: Header for the door header (the default is “This area is password protected.”); Paragraph for a text under the header (the default is “Welcome! This is a private area. Please enter the password below.”); and then the Password. If you are just a guest, the Edit button wouldn’t appear. Don’t forget to press X again to close the door, because when you open the password door, it will remain opened until you press X again to close it from the inner side of the room (it doesn’t mean it’s not works from the outer side of the room hehe).
You need Password Doors extension when you need some private room that only you or your team can access. Please be know that it doesn’t ensure only you can access that door, if you have any other member with a “Builder-role” they can just simply delete the door, or adding some secret portal tiles to go to your room. Also the other moderator can edit the password as well. So this feature only applied for a complete guest participant for a total security.
For the Locked Doors extension, I rarely use this extension because I don’t find any functionality on this extension. I usually just use the automatic open/closed door for visual as I mention before because its easier to setup (just using a simple interactive object). But if you want your participant do more action to press X more than just walking, this Locked Doors extension is good.
Friendly Plant

Friendly Plant is an extension that can be use as an interactive plant. You can press X to water the plant so the plant can be by time. As the developer said on the extension description, its just for fun, so its just a decorative that doesn’t have any important functionality. Since we can’t customize the plant visual, I don’t find any exciting move to do with this extension. It will be different if you can customize the visual, it will be funnier I think!
Timed Objects
If you have tried Display (start) and Display (end) on Advance options on Interactive Objects, you will little bit understand about this extensions. Technically, this Gather Town extension will let some object to be shown/hidden on the exact time which has been specified. The different between Timed Objects extensions and Display (start/end) is the time range.
For the Timed Objects, it based on hours and minutes that will be applied everyday. For the Display (start/end), it based on some specific time only. So if you need the object to be shown daily, the better way to do it is by using the Timed Objects rather than the Display (start/end) since you need to manually update it again and again.
However this extension have some shortage, because you can’t apply interactive object using this extensions. This extension is purely for decoration, and the decoration can’t be interactive like opening some website, etc. Its also can’t be applied to Foreground, so if you are creative enough and you want something like adding a day/night effect to your space, unfortunately you can’t do that yet using this extension. But if you want to add some decoration like Available or Closed Office Hour, its good to use this extension. All timing system in this extension is using UTC Military Time, so make sure you adjust your time zone into UTC+0 first.
Applause
When you activate this applause extension, you will not see the extension on the More Object panel. Its because this extension will be applied as ambience effect to enhance the user experience.When you activate this extension, and at some event several participant use a party popper emoticon (Press 3), dancing (Press Z), or launch a confetti (Press F), you will hear an applause audio.
The audio will be louder when the number of participant launching reaction is bigger. When you are doing it alone, you will hear nothing. Its great for some keynote speaker session, to make the user experience something like in a real session. However, we can’t manage how people will use this feature. Somehow something like a bunch of troll participant doing reaction and it can disturb the speaker can happen.
Although, the developer give an option to deactivate the feature for some room. Its basically because when you activate the extension, it will be applied to the whole space. You can set where you want to deactivate the extension.

For me personally, I rarely use this Gather Town extension. When I was the organizer for some event, I think the basic reaction was enough to show appreciation. But if you want something different, this extension can be an option. Rather than set where the room you want to deactivate the extension — which is can be troublesome, just activate the extension whenever you need the feature is the best practice to use this extension, imho.
Deca Art

Deca Art extension is an extension that can be useful for map builder. Sometimes we are kind of stuck to decide what things we can add to the wall. Deca Art extension can be an option. When you activate this extension, you will see it on the More Object Panel. Deca Art extension will provide a wall picture that changing regularly. So instead of placing a static object, you can place a deca art to get a different picture. It will change anytime you press X to the object. Its available on many size, but unfortunately we can’t customize the size. We need to adjust our map design with the available deca art size when we want to use this extension.
Vote with Your Feet

This extension will allow you to do an interactive way to do a voting. This voting system basically run based on how many people on the chosen specific private area. To make the vote, we need to make all the private area first. Let say you need to vote between 3 options, then make 3 different private areas with different area ID. You can input the private area ID when you place the Vote object. Make sure you name each private area with the name of the vote will be. Let say you want to make a vote between “Agree” and “Disagree”, so make sure you name you private area ID as “Agree” and “Disagree” as well.
The vote object is a yellow flower vases, so make sure you place a desk below the vote object to make it seamless. Every time you press X on the vote object, a bot will launch a message. It based on how many people standing on each voting’s private area. In advance options, you can change the Custom Preview Message (it will change the “Press X to tally votes” into your new custom message). Also the Message format for each groups and for winning groups (it will change the message on the chat box).
World Clock
This Gather Town extension might be suitable for you if you have a member more than one time zone. This Gather Town extension basically will add and actual time information on your avatar status based on information you give. You can see the image below on the right side. After you activate the extension and place the object, you can press X to the object. There will be a pop-up with form field inside it. The first field will be the location of the time zone you want to place as your status. You can add your city with your region, state, or country in the first field. The second field will be a suffix after your time status. You can type whatever in this field. The status will be “[First field] in [Second field]” like it shown below. You can make it fun like 20:10 in Hell or 12:00 in the Spongebob House. Everything that can come to your mind LOL.
Pets & GoKarts
The last one is Pets and GoKarts extensions. I will not explain about this Gather Town extension again, because I already made an articles about these two things. About Pets extension, you can access it in this article. About GoKarts extension, you can access it in this article.
We come to the end of the explanation! I didn’t mean to make it too long, I just try to make it simple but comprehensive one. After this I hope you understand about all the Gather Town extension. Also you know when you need to use each one of it. Its nice to follow all the improvement of Gather Town, as this platform is one of my income stream. So the better the platform, I will also getting advantage. So I will make sure to help you all understand about the platform better.
If you still have any question related to this tutorial, just left a comment and I will be happy to answer if I can. Also if you want to give appreciation, you can go to my Ko-fi site to give me some coffee. It will be appreciate so much for this site development. See you next time in the next article! Sampai jumpa lagi!
1 thought on “Gather Town Extension Explained! Understand about Gather Town Extension Easier”
Pingback: How to Record Your Gather Town Activity - With Julio